Quantcast
Channel: video – Robohub
Viewing all 284 articles
Browse latest View live

The Year of CoCoRo Video #51/52: Big Vision

$
0
0
underwater_swarm_cocoro_robot_surfacestation_vision

Our penultimate video features the initial “Big Vision” trailer we produced at the beginning of this project. The video showcases the basic components of the robotic system we targeted (surface station, relay chain, ground swarm) and how we imagined our collective of underwater robots forming coherent swarms.

Our “Big Vision” helped us stay focussed on the project, ensuring that all project partners shared the same goal for their work. We based the video on a small simulator, written by us. Little did we know that this simple simulator would develop into a critical tool that would eventually include underwater physics with fluid dynamics for simulating underwater swarms. The simulator was also used in evolutionary computation to find good shoaling behavior for our robots.

Next week we will be publishing our final video in the Year of the CoCoRo. Our finale will show the whole system on real underwater robots in a comparable setting and how our initial vision finally became reality!

The EU-funded Collective Cognitive Robotics (CoCoRo) project has built a swarm of 41 autonomous underwater vehicles (AVs) that show collective cognition. Throughout 2015 – The Year of CoCoRo – we’ll be uploading a new weekly video detailing the latest stage in its development.


Raffaello D’Andrea at TED2016: Novel flying machines and swarms of tiny flying robots

$
0
0

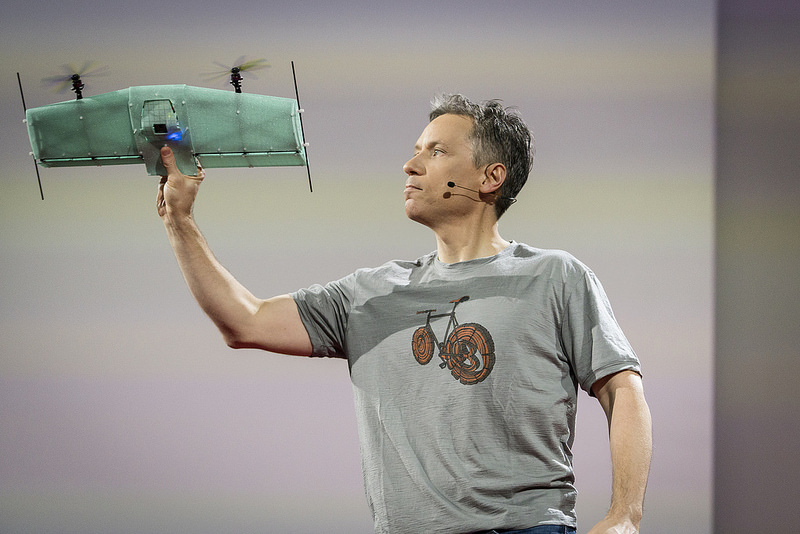
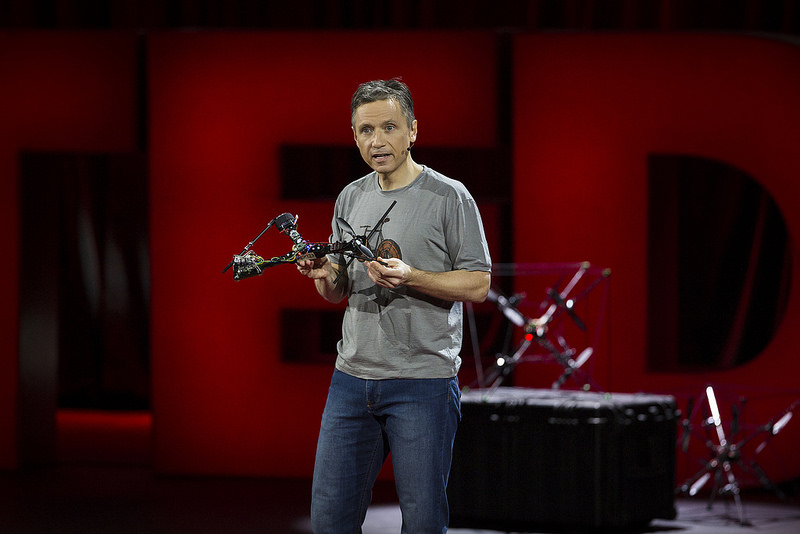
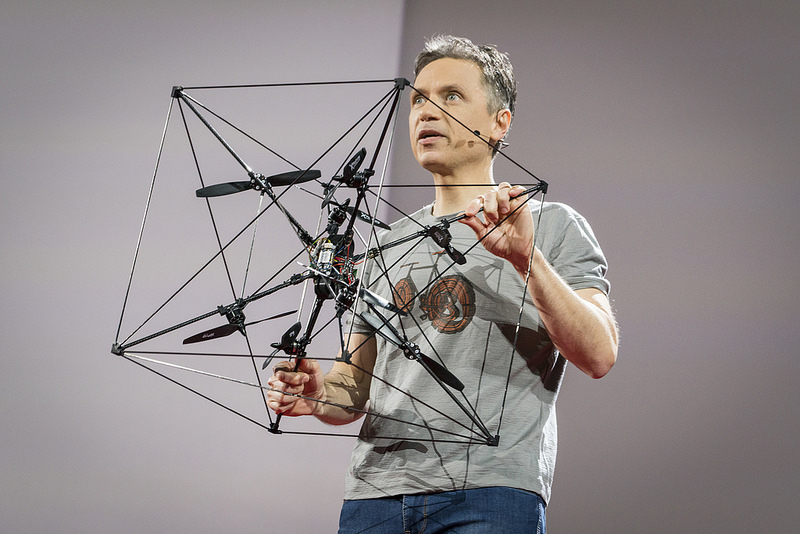
Last week Raffaello D’Andrea, professor at the Swiss Federal Institute of Technology (ETH Zurich) and founder of Verity Studios, demonstrated a whole series of novel flying machines live on stage at TED2016: From a novel Tail-Sitter (a small, fixed-wing aircraft that can optimally recover a stable flight position after a disturbance and smoothly transition from hover into forward flight and back), to the “Monospinner” (the world’s mechanically simplest flying machine, with only a single moving part), to the “Omnicopter” (the world’s first flying machine that can move into any direction independent of its orientation and its rotation), to a novel fully redundant quadrocopter (the world’s first, consisting of two separate two-propeller flying machines), to a synthetic swarm (33 flying machines swarming above the audience).

Most of D’Andrea’s work shown at this latest demonstration is dedicated to pushing the boundary of what can be achieved with autonomous flight. One key ingredient is localization: To function autonomously, robots need to know where they are in space. Previously his team has relied on an external high-precision motion capture system available in his Flying Machine Arena at ETH Zurich for positioning. In his previous TED talk on robot athletes for example, you can clearly see the reflective markers required by the motion capture system. This meant that most algorithms were difficult to demonstrate outside the lab. It also meant that the system had a single point of failure (SPOF) in the centralized server of the mocap system — a highly problematic point for any safety critical system.

In another world first, Raff and his team are now showing a newly developed, doubly redundant localization technology from Verity Studios, a spin-off from his lab, which gives flying machines, and robots in general, new levels of autonomy. For the live demonstrations, all flying machines use on-board sensors to determine where they are in space and on-board computation to determine what their actions should be. There are no external cameras. The only remote commands the flying robots receive are high level ones, such as “take-off” or “land”.

The nature of this performance was also unprecedented in that it did not use safety nets to separate the audience from the action, and in that it even saw dozens of vehicles fly directly above the audience.

The performance included demonstrations of various safety systems for flying machines, including a large, high-performance quadcopter that is fully redundant and that utilizes a state-of-the-art failsafe algorithm (see previous Robohub article) among its many other onboard and offboard safety features.

Following extensive technical discussions on the various failure modes of the positioning system and of each flying machine as well as on the systems’ numerous redundancies and safety features, the organizers of TED had full faith in the systems’ safety and reliability. So much so that they decided to indemnify the venue against any lawsuits to overcome its ban on drones.

Here is the video:

And here is a more in-depth breakdown of what you are seeing, based on a transcript of the presentation and information from Raff D’Andrea’s team:

Intro video – Institute for Dynamic Systems and Control (IDSC), ETH Zurich

The video shows some of the previous work of D’Andrea’s group on aerial construction: A 6-meter tall tower built out of 1500 foam bricks by four autonomous quadcopters over a three day period in front of a live audience and a rope bridge built by three autonomous quadcopters in the Flying Machine Arena.

Live demo 1: Tail-Sitter – IDSC, ETH Zurich

Credit: Bret Hartman / TED

The Tail-sitter. Photo: Bret Hartman / TED

“This is a so-called tail-sitter. It’s an aircraft that tries to have its cake and eat it: Like other fixed wing aircraft, it is efficient in forward flight, much more so than helicopters and variations thereof. Unlike most other fixed wing aircraft, however, it can hover, which has huge advantages for take-off, landing, and general versatility. There is no free lunch, unfortunately, and one of the challenges with this type of aircraft is its susceptibility to disturbances, such as wind-gusts, while hovering. We are developing control architectures and algorithms that address this limitation. [Pushes the vehicle, then grabs it and throws it] The idea is to allow the aircraft to autonomously recover no matter what situation it finds itself in. [Second throw] And through practice, improve its performance over time. [Third throw, violently spinning the vehicle]”

Demo 2 (video of demo the night before): Monospinner – IDSC, ETH Zurich

Credit: Marla Aufmuth / TED

The Monospinner. Photo: Marla Aufmuth / TED

“When doing research we often ask ourselves abstract, fundamental questions that try to get at the heart of a matter. One such question: What is the minimum number of moving parts necessary for controlled flight? This line of exploration may have practical ramifications; take helicopters, for example, which are affectionately known as “machines with over 1000 moving parts all conspiring to cause bodily harm”. Turns out that decades ago skilled pilots were flying RC airplanes with only 2 moving parts: a propeller and a tail rudder. We recently discovered that it could be done with only 1.”

“This is the monospinner, the world’s mechanically simplest, controllable flying machine, invented just a few months ago. It has only one moving part, a propeller. There are no flaps or hinges, no control surfaces or valves, no other actuators. Just one propeller. Even though it is mechanically simple, there is a lot going on in its electronic brain to keep it stable and move through space in a controllable fashion. Even so, it does not yet have the recovery algorithms of the tail-sitter, which is why I have to throw it just right.”

Live demo 3: Omnicopter – IDSC, ETH Zurich:

Credit: Bret Hartman / TED

The Omnicopter. Photo: Bret Hartman / TED

“If the monospinner is an exercise in frugality, this machine here, the omnicopter, with its 8 propellers, is an exercise in excess. What can you do with this surplus? The thing to notice is that it is highly symmetric, and as a result it is ambivalent to orientation. This gives it an unprecedented capability: It can move anywhere in space, independently of where it is facing, and even of how it is rotating. It has its own complexities, mainly due to the complex, interacting flows of its 8 propellers. Some of this can be modeled, while the rest can be learned on the fly. [Omnicopter takes off, manoeuvres around the stage, lands]”

Live demo 4: Fully redundant multicopter – Verity Studios

Credit: Ryan Lash / TED

Fully redundant quadcopter. Photo: Ryan Lash / TED

“If flying machines are going to find their way into our daily lives, they will need to become extremely safe. This machine here is a prototype being developed by Verity Studios. It actually consists of two separate, two propeller flying machines, each capable of controlled flight. One wants to rotate clockwise, the other one counter clockwise. When all systems are operational, it behaves like a high-performance, 4 propeller quadrocopter. [Quadcopter takes off and flies an arc across the stage] If anything fails, however – propeller, motor, electronics, even a battery pack – it is still able to fly, albeit in a degraded way [One half of the quad is de-activated, the quadrocopter starts to spin and fall, the failsafe mode kicks in and the quadrocopter recovers, flies to the back of the stage, and performs a controlled landing at the takeoff spot].”

Live demo 5: Synthetic swarm, 33 small flying machines – Verity Studios

Credit: Bret Hartman / TED

Photo: Bret Hartman / TED

“This last demonstration is an exploration of synthetic swarms. The large number of coordinated autonomous entities offers a radically new palette for aesthetic expression. We have taken commercially available micro-quadrocopters, each weighing less than a slice of bread, and equipped them with our localization technology and custom algorithms. Because each unit knows where it is in space and is self-controlled, there really is no limit to their number. [Swarm performance]”

Raffaello D’Andrea wrapped up with: “Hopefully these demonstrations will motivate you to dream up new revolutionary roles for flying machines. For example, the ultra-safe flying machine [points to the fully redundant multicopter] has aspirations to become a flying lampshade on Broadway. The reality is that it is difficult to predict the impact of nascent technology. And for folks like us, the real reward is the journey, and act of creation. It is also a continual reminder of how wonderful and magical the universe we live in is; that it permits clever, creative creatures to sculpt it in such spectacular ways. The fact that this technology has huge commercial potential is just icing on the cake.”

More photos for your viewing pleasure:

Photo: Bret Hartman / Ryan Lash / TED

Photo: Bret Hartman / Ryan Lash / TED

Photo: Bret Hartman / Ryan Lash / TED

Photo: Bret Hartman / Ryan Lash / TED

Photo: Bret Hartman / Ryan Lash / TED

Photo: Bret Hartman / Ryan Lash / TED

Photo: Steven Rosenbaum / Waywire

Photo: Steven Rosenbaum / Waywire

WeRobot 2015 Keynote: The future of robotics, with R2D2 maker Tony Dyson

$
0
0
Photo courtesy We Robot 2015.

Photo courtesy We Robot 2015.

UPDATED 4 Mar: We’re sad to report that Professor Tony Dyson, who built the original Star Wars R2-D2 droid, has died. We’re reposting this excellent video of his keynote at WeRobot to highlight his contribution to the field of robotics and culture.

In motion: Video transmission by mobile drones

$
0
0
raheeb

Raheeb Muzaffar, an information technology specialist, has developed an application-layer framework that improves the transmission of videos between moving drones and mobile devices located at ground level. His work within the Interactive and Cognitive Environments (ICE) doctoral programme will be completed soon. Raheeb explains what makes this technology innovative and talks about his plans for the future in a conversation with Romy Mueller.

Raheeb Muzaffar was already aware of what to expect when he arrived in Klagenfurt as a PhD student, travelling from Islamabad, the capital of Pakistan, December 2012: He’s travelled well before, had experience working with various universities and professional organizations, and was acquainted both with the European culture and the research environment. The doctoral programme “Interactive and Cognitive Environments (ICE)” suited him perfectly, allowing him to conduct research in an international environment. Doctoral students accepted into the programme are funded for a period of three years. During this time, they work at two universities. The research teams at the Alpen-Adria-Universität and the Queen Mary University in London offered Muzaffar, who wanted to work on the communication between drones, an environment that allowed him insight into various laboratories and research approaches. By combining the key research areas he experienced in Austria and Great Britain, he ultimately arrived at his very own topic: video transmission in drone networks.

He spotted a problematic issue in this context, which he has studied very closely over the past few years. “In a situation where several drones are airborne and are transmitting videos to several units located at ground level, we cannot currently guarantee that the footage will be reliably transmitted.” The problem is that the receiving devices do not have a feedback mechanism for the video packets being transmitted from the drones. The missing feedback mechanism causes unreliability rendering a distorted video reception. Also, when the transmitting devices and the receiving devices are in motion, the wireless transmission conditions are subject to continuous change, introducing an additional factor of uncertainty.

To address this problem, Raheeb Muzaffar has developed a so-called “video multicast streaming framework”, which allows feedback from multiple ground devices to the drones to add reliability allowing a smooth video reception. However, the framework is even more capable: “The drone does not only learn whether the video has arrived, but thanks to the feedback mechanism, the drone can adjust the transmission rate and the video quality to match the prevailing wireless conditions. Thus, the transmitting drones can re-send lost video packets following the transmission and video rate adaption.” Video communication between drones and receiving devices is useful for various applications such as search and rescue, surveillance, and disaster management.

When we asked him, if he can make profitable use of his technology, Raheeb Muzaffar laughed. At various conferences, he talked to the developers from the industry, who confirmed to him that modules endowed with similar functionality are expensive and that the WLAN protocol requires modification. However, his application is freely available. Anyone wishing to commercialise the technology as a product, is able to do so. In any case, over the course of numerous simulations and experiments, he has demonstrated that the streaming framework works and uses the conventional WLAN protocol without modifications.

Muzaffar’s research in Klagenfurt is coming to an end. By November, he will complete his doctoral thesis, and will pull up stakes in Klagenfurt, following his hopes and dreams to work in the research-based industry. The researcher was accompanied by his wife when he came to Klagenfurt. In the meantime, they celebrated the birth of their daughter. The Muzaffar family intends to travel more: “I am not tied to one location. I would enjoy working anywhere in Europe, but we also like the idea of moving to New Zealand.”

A few words with Raheeb Muzaffar

What career would you have chosen, if you had not become a scientist?

If I would not have become a scientist, I would have become a social worker. Before turning to research, I worked with Non-governmental organizations including iMMAP and UNICEF thinking that my technical expertise could help expedite the social work that the organizations are involved in. Besides the work I do plan to involve myself in some sort of social work may it be technical, educational, financial or emotional.

Do your parents understand what it is you are working on?

Yes, especially my father, he is quite interested in technology. He may not have the technical details but he is aware of research and the work I am involved in.

What is the first thing you do when you arrive at the office in the morning?

First thing in the morning is to check and answer my emails. Thereafter, I work by the plan. I always have a plan for the week/month regarding the tasks I need to do. Although sometimes things don’t go by the plan and I have to readjust the plan to meet deadlines.

Do you have proper holidays? Without thinking about your work?

Yes, at least once a year.

Why are so many people afraid of technical sciences?

In my opinion, every individual has a different aptitude to his/her work domain and one should do what one thinks he/she is interested in and can perform best. Having said that, working in the domain of technical science is quite challenging. The field has advanced and it is getting increasingly complex to even gain the basic understanding of different domains. To work in this field, one has to stay up to date. Developing something new involves a minimal margin of error. I think, people are afraid due to the complex nature of the studies that involve an extra bit of hard work, understanding, and patience.

Written by: Romy Müller, University of Klagenfurt

Originally published in German language in AAU News of the University of Klagenfurt, Austria. Also published at Medium.com.

Sticky business: Five adhesives tested for 3D printing

$
0
0

We compared five adhesives for 3D printing applications on a Wanhao Duplicator i3. We’ll print a PLA (polylactide) cube, 1х1х1 cm in size.

1.  NELLY LACQUER: We spread it on the clean surface of the table and turn on the Print Mode. The printed model is very well stuck—a pallet-knife is needed to separate it from the surface of the table. The adhesion result is very good.

2.  THE 3D GLUE: We apply it to the table with a cloth, wait for the table to warm up, then start printing. The result is similar to Nelly lacquer. We can’t separate the printed model from the table without any tools. The bottom of the cube is smooth.

3.  PVA GLUE: We spread a small quantity on the table and let it dry before printing. It is not easy to tear the model from the table. The bottom surface of the cube is rather rough and has PVA glue stains.

4.  GLUE STICK: We try to apply a thin layer of it to the hot platform but, because the adhesive is very thick, we can’t do it using a microfiber cloth. To separate the cube from the platform we use a pallet-knife. The bottom surface of the model and the platform surface have white glue stains. Now we need to clean the table and apply an adhesive anew.

5.  STICKY TAPE (an analogue of a blue Scotch): Finally, we paste one layer of it to the table, carefully smoothing it out to avoid blistering. This adhesive is no good for big ABS models as they tend to break away from the table along with the tape.

We try to accurately separate the cube from the table to prevent the tape from peeling off, but part of the tape stuck too well to the cube and came off the table along with the model. Now we’ll have a naked spot (without the tape layer) on the table when we print next time.

Conclusions

  • The lacquer and 3D glue give the best results; the bottom surface of the printed models is clean and smooth, without any traces of adhesives.
  • The glue stick stains the models.
  • The Scotch tape tends to stick to the model and comes off from the table partially or fully.
  • For ABS printing we recommend using a closed 3D printer and a strong adhesive, like NELLY.

If you liked this article, you may also want to read these other articles on 3D printing:

See all the latest robotics news on Robohub, or sign up for our weekly newsletter.

Call for holiday robot videos 2016

$
0
0
robot-santa-call-for-holiday-videos

That’s right! You better not run, you better not hide, you better watch out for brand new robot holiday videos on Robohub! Drop your submissions down our chimney at editors@robohub.org and share the spirit of the season, like these vids-of-Christmas-past…


Brian Cox presents Science Matters: Machine learning and artificial intelligence

$
0
0
machine-learning

We’re beginning to see more and more jobs being performed by machines, even creative tasks like writing music or painting can now be carried out by a computer.

But how and when will machines be able to explain themselves? Should we be worrying about an artificial intelligence taking over our world or are there bigger and more imminent challenges that advances in machine learning are presenting here and now?

Join Professor Brian Cox, the Royal Society Professor of Public Engagement, as he brings together experts on AI and machine learning to discuss key issues that will shape our future. Panelists include:


You might also enjoy the following articles about AI and AI/robotics policy:

See all the latest robotics news on Robohub, or sign up for our weekly newsletter.

What is machine learning?

$
0
0
machine-learning-2

In this fascinating animation from Oxford Sparks, we take a look at how statistics and computer science can be used to make machines that learn for themselves, without being explicitly programmed.

Machine learning is a burgeoning breed of artificial intelligence (AI), and it’s all around us already; on our phones, powering social networks, helping the police and doctors, scientists and mayors. But how does it work? Enjoy the video below, and visit Oxford Sparks to discover more science and research from Oxford University.


You might also enjoy the following posts about AI and AI/robotics policy:

See all the latest robotics news on Robohub, or sign up for our weekly newsletter.


Responsive and Responsible Leadership given prominance at #WEF17 World Economic Forum

$
0
0
world-economic-forum-2017-theresa-may

The population of the scenic ski-resort Davos, nestled in the Swiss Alps, swelled by nearly +3,000 people between the 17th and 20th of January. World leaders, academics, business tycoons, press and interlopers of all varieties were drawn to the 2017 World Economic Forum (WEF) Annual Meeting. The WEF is the foremost creative force for engaging the world’s top leaders in collaborative activities to shape the global, regional and industry agendas for the coming year and beyond. Perhaps unsurprisingly given recent geopolitical events, the theme of this year’s forum was Responsive and Responsible Leadership.

With the onset of the fourth industrial revolution, increasingly discontented segments of society not experiencing congruous economic and social progress are in danger of existential uncertainty and exclusion. Responsive and Responsible Leadership entails inclusive development and equitable growth, both nationally and globally. It also involves working rapidly to close generational divides by exercising shared stewardship of those systems that are critical to our prosperity.

In the end, leaders from all walks of life at the Annual Meeting 2017 must be ready to react credibly and responsibly to societal and global concerns that have been neglected for too long.”

Developing last year’s theme—“The fourth industrial revolution”—this year’s luminaries posited questions, among many others, concerning incipient robotics and artificial intelligence technologies set to have a pronounced impact on the global economy and global consciousness alike. What can we learn from the first wave of AI? How can the humanitarian sector benefit from big data algorithms? How will drone technology change the face of warfare? Can AI and computational tech help foster responsive and responsible leadership? What are the downsides of technology in the fourth industrial revolution?

Enjoy a selection of tech-themed videos below.


And a bit about global science including big data, open source science and education.

Artificial intelligence and ethics: Who does the thinking?

$
0
0
IEEE-main-AI-ethics-2016

Image: IEEE

On the 15th November 2016, the IEEE’s AI and Ethics Summit posed the question: “Who does the thinking?” In a series of key-note speeches and lively panel discussions, leading technologists, legal thinkers, philosophers, social scientists, manufacturers and policy makers considered such issues as:

  • The social, technological and philosophical questions orbiting AI.
  • Proposals to program ethical algorithms with human values to machines.
  • The social implications of the applications of AI.

Click here to read the final report, and enjoy a selection of videos from the conference below.


Welcome: Marko Delimar
Keynote Speaker: Wojciech Wiewiórowski


Panel 1: Autonomous Systems – Managing Risk and Reward
Panel Members: Raja Chatila, Kay Firth-Butterfield, Juha Heikkilä, Jérôme Perrin


Panel 2: Programming Human Ethics: Cui Bono?
Panel Members: Joanna Bryson, Mady Delvaux, Sarah Spiekermann, Corrine Cath


Panel 3: Social Implications – Perils & Promises of AI
Panel Members: Greg Adamson, Nikolaos Mavridis, Paul Nemitz, Aurélie Pols


Closing Remarks: John C. Havens


You might also enjoy the following articles about AI and AI/robotics policy:

See all the latest robotics news on Robohub, or sign up for our weekly newsletter.

Python programming your NAO robot

$
0
0

These videos aim to teach you how to begin programming your NAO with Python. The NAO can be programmed using several programming languages, including C++, MATLAB, JAVA, LabVIEW and Python. Instead of using the drag and drop boxes in the Choreograph, we’re going to get our NAO robot walking and talking using coding.

Tutorial 1: Speech

Helpful hints:

Follow these steps to create a box that we could put our python code into, and have our robot speak: “Hello”. “Hello I am a robot”.

  1. Right click the main section box and go to “add new box”
  2. Create a name for the box
  3. Input main image
  4. Select the type of box

Now we’re having a look at the script. Go into the scripts and click ok. And there we have our NAO little box. If we click into it, we have the python code. What we are going to do is change some of the codes to get our robot to speak.

  1. Double click the box
  2. Select the piece of code you need to alter to get our robot to speak(“def onInput_onStart(self)”)
  3. Take out the pass section
  4. Type in “ttsproxy = ALProxy(“ALTextToSpeech”)”. (Make sure you get the comment in there).
  5. Underneath that, we are going to put “ttsproxy.say” and add the comment “Hello, I am a robot”.

The first line could create an object that gives us access to the robot’s text to speech capabilities. This object is assigned to the variable ttsProxy. We can access the object later through the name ttsProxy. I am going to mount the top line, and the alspeech is there. The second line calls a different function site. This function takes an argument “Hello, I am a robot” and then he uses a string or sequence of characters between two double quoted marks. The robot will speak the string that will pass to the say message aloud.  There are your simple first steps into python and choreograph.

You can now, hopefully, get your NAO robot to talk by using your python programming skills. Now have a play with it’s behavior to see if you can get your NAO to say a longer sentence, or maybe even sing a song. Have a play, and use your imagination!


Tutorial 2: Walking

Helpful hints:

No we’re going get your robot to walk using Python. The NAO can be program to walk to any point using the in-build Python Programming Language instead of using the drag and drop boxes in the choregraphe. Python is more expressive and allows you to do things like computing trigonometric calculations on the robot.

  1. Right click the main section box and go to “add new box”
  2. Create a name for the box
  3. Input main image
  4. Select the type of box

First, we want our robot to stand up. Drag a stand up icon into the box. I am actually using the NAO key so the 3D robot in the robot view, and this because we need to put the robot on connecting so we can see what’s going on quite clearly. Oversee when you are using this on the real robot and never forget to trigger on the motors and connect everything up properly.

Open the Code Box

  1. Go to “def onInput_onStart(self):”
  2. Write “motionProxy = ALProxy(“ALMotion”)”
  3. On the next line write “walkTo(0.2,0.0,0.0)”
  4. End it with “self.onStopped()”

The first line is a proxy called ALmotion, which what is we created here, which allows us to call the motion functions up. The second line is the walkTo, which moves the robot to a specific distance. Now, look on the decimal places: see that .2 is X and Y and the radius, so he’s going to move .2 forward. Then if I start playing with the other numbers here, he’ll move to the Y radius and then to the other turning point as well. The final bit is the self.on. To stop this, we will call and tell the choregraphe to stop the procedure when it is at the end and just simple loop and loop and loop.

If we are good, we should see this now on the 3D NAO. So if I hit play, we can see it walking along. Well done guys, you can now get your NAO Robot to walk by using
your Python programming skills. Tread carefully!


If you liked this article, you may also enjoy these:

See all the latest robotics news on Robohub, or sign up for our weekly newsletter.
Hard at work: A review of the Laevo Exoskeleton

$
0
0

Back pain is one of the leading causes of work absenteeism in the UK, with 8.8 million days lost to work-related muscoskeletal disorders per year. On average, each case causes 16 days of absenteeism, and chronic conditions can cause some absences to become permanent.

But working in a bent forward, back straining posture is unavoidable in a great many professions, like in hospital, agricultural and warehouses environments to name but a few. This regular exposure to demanding postures increases the risk of debilitating pain, which can severely reduce productivity and moral in the workforce.

The Laevo Exoskeleton aims to alleviate this problem. The Laevo is a unique, wearable back-support that aids users working in a bent forward posture or lifting objects. The wearable frame carries part of the upper body weight of the user, thereby decreasing the strain on the lower back and improves the long-term employability of employees.

Video 1: The product

Video 2: See it in action


If you liked this article, you may also enjoy these:

See all the latest robotics news on Robohub, or sign up for our weekly newsletter.
Leg over wheels: Ghost robotics’ Minitaur proves legged capabilities over difficult terrain

$
0
0

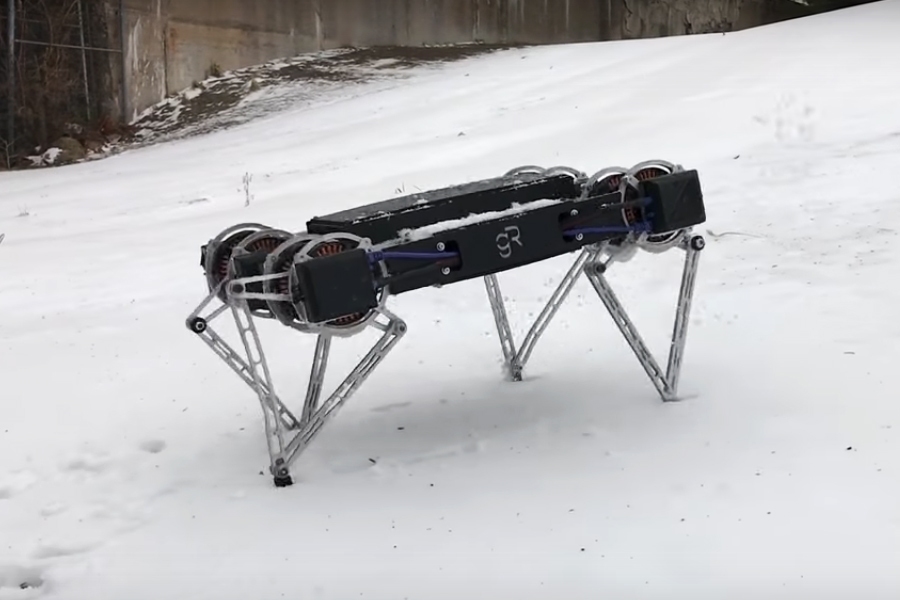
Ghost Robotics—a leader in fast and lightweight direct-drive legged robots—announced recently that its Minitaur model has been updated with advanced reactive behaviors for navigating grass, rock, sand, snow and ice fields, urban objects and debris, and vertical terrain.

The latest gaits adapt reactively to unstructured environments to maintain balance, ascend steep inclines up to 35º, climb up to 15cm curb-sized steps, crouch to fit under crawl spaces as low as 27cm, and operate at variable speeds and turning rates. Minitaur’s high-force capabilities enable it to leap up to 40cm onto ledges and across gaps of up to 80cm. Its high control bandwidth allows it to actively balance on two legs, and its high speed operation allows its legs to navigate challenging environments rapidly, whilst reacting to unexpected contact.

“Our primary focus since releasing the Minitaur late last year has been expanding its behaviors to traverse a wide range of terrains and real-world operating scenarios,” said Gavin Kenneally, and Avik De, Co-founders of Ghost Robotics. “In a short time, we have shown that legged robots not only have superior baseline mobility over wheels and tracks in a variety of environments and terrains, but also exhibit a diverse set of behaviors that allow them to easily overcome natural obstacles. We are excited to push the envelope with future capabilities, improved hardware, as well as integrated sensing and autonomy.”

Ghost Robotics is designing next-generation legged robots that they claim are superior to wheeled and tracked autonomous vehicles in real-world field applications. They are also attempting to substantially reduce costs to drive adoption and scalable deployments. Whilst a commercial version of the Ghost Minitaur robot is slated for delivery in the future, the current development platform is in high demand, and has been shipped to many top robotics researchers worldwide (Carnegie Mellon, University of Pennsylvania, University of Washington, U.S. Army Research Labs and Google) for use in a broad range of research and commercialization initiatives.

“We are pleased with our R&D progress towards commercializing the Ghost Minitaur to prove legged robots can surpass the performance of wheel and track UGVs, while keeping the cost model low to support volume adoption—which is certainly not the case with existing bipedal and quadrupedal robot vendors,” said Jiren Parikh, Ghost Robotics, CEO.

In the coming quarters, the company plans to demonstrate further improvements in mobility, built-in manipulation capabilities, integration with more sensors, built-in autonomy for operation with reduced human intervention, as well as increased mechanical robustness and durability for operation in harsh environments. Watch this space.


If you enjoyed this article, you might also be interested in:

See all the latest robotics news on Robohub, or sign up for our weekly newsletter.

Programming for robotics: Introduction to ROS

$
0
0

This handy video-tutorial course gives an introduction to the Robot Operating System (ROS), including many of the available tools that are commonly used in robotics. With the help of different examples, the tutorials offer a great starting point to learn programming robots. You will learn how to create software including simulation, to interface sensors and actuators, and to integrate control algorithms.

The course consists of a guided tutorial and exercises with increasing level of difficulty working with an autonomous robot. We provide recordings of the lectures and give an introduction to the exercises. From the course website, you can download all the material including exercise sheets and templates, and use the provided Virtual Machine (VM) image to start programming right away.

Objectives:

  • ROS architecture: Master nodes, topics, messages, services, parameters and actions
  • Console commands: Navigating and analyzing the ROS system and the catkin workspace
  • Creating ROS packages: Structure, launch-files, and best practices
  • ROS C++ client library (roscpp): Creating your own ROS C++ programs
  • Simulating with ROS: Gazebo simulator, robot models (URDF) and simulation environments (SDF)
  • Working with visualizations (RViz) and user interface tools (rqt)
  • Inside ROS: TF transformation system, time, bags

Course 1:


Course 2:


Course 3:


Course 4:

Download the full presentation here.

P. Fankhauser, D. Jud, M. Wermelinger, M. Hutter, “Programming for Robotics – Introduction to ROS”, ETH Zurich, 2017. DOI: 10.13140/RG.2.2.14140.44161


If you liked this tutorial, you may also enjoy these:

See all the latest robotics news on Robohub, or sign up for our weekly newsletter.
UgCS photogrammetry technique for UAV land surveying missions

$
0
0


Figure 15: Adding 40m overshot to both ends of each survey line

UgCS is easy-to-use software for planning and flying UAV drone-survey missions. It supports almost any UAV platform, providing convenient tools for areal and linear surveys and enabling direct drone control. What’s more, UgCS enables professional land survey mission planning using photogrammetry techniques.

How to plan photogrammetry mission with UgCS

Standard land surveying photogrammetry mission planning with UgCS can be divided into following steps :

  1. Obtain input data
  2. Plan mission
  3. Deploy ground control points
  4. Fly mission
  5. Image geotagging
  6. Data processing
  7. Map import to UgCS (optional)


Step one: Obtain input data

Firstly, to reach the desired result, input settings have to be defined:

  • Required GSD (ground sampling distance – size of single pixel on ground),
  • Survey area boundaries,
  • Required forward and side overlap.

GSD and area boundaries are usually defined by the customer’s requirements for output material parameters, for example by scale and resolution of digital map. Overlap should be chosen according to specific conditions of surveying area and requirements of data processing software.

Each data processing software (e.g., Pix4D, Agisoft Photoscan, Dronedeploy, Acute 3d) has specific requirements for side and forward overlaps for different surfaces. To choose correct values, please refer to documentation of chosen software. In general, 75% forward and 60% side overlap will be a good choice. Overlapping should be increased for areas with small amount of visual cues, for example for deserts or forests.

Often, aerial photogrammetry beginners are excited about the option to produce digital maps with extremely high resolution (1-2cm/pixel), and to use very small GSD for mission planning. This is very bad practice. Small GSD will result in longer flight time, hundreds of photos for each acre, tens of hours of processing and heavy output files. GSD should be set according to the output requirements of the digital map.

Other limitations can occur. For example, GSD of 10cm/pixel is required, but designed to use a Sony A6000 camera. Based on mentioned GSD and camera’s parameters, the flight altitude would be set to 510 meters. In most countries, maximum allowed altitude of UAV’s (without special permission) is limited to 120m/400ft AGL (above ground). Taking into account the maximum allowed altitude, the maximum possible GSD in this case could be no more than 2.3cm.


Step two: Plan your mission

Mission planning consists of two stages:

  • Initial planning,
  • Route optimisation.

-Initial planning:

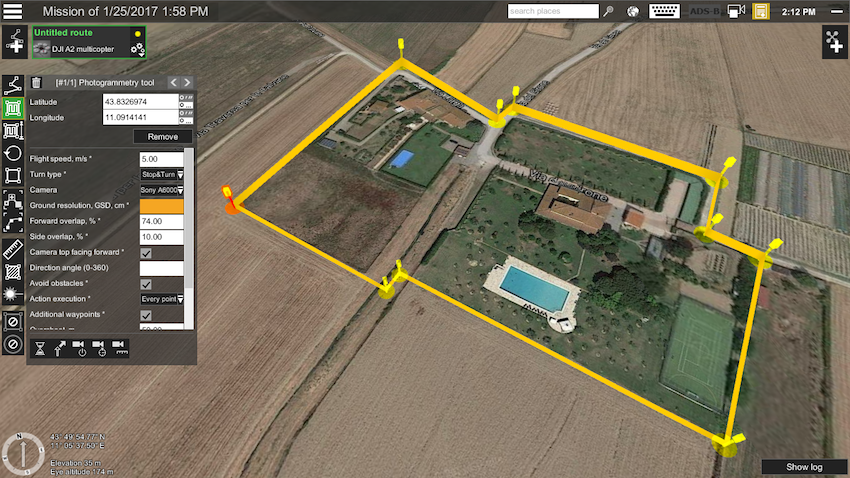
The first step is to set surveying area using UgCS Photogrammetry tool. Area can be set using visual cues on underlying map or using exact coordinates of edges. The result – survey area is marked with yellow boundaries (Figure 1).

Figure 1: Setting the survey area

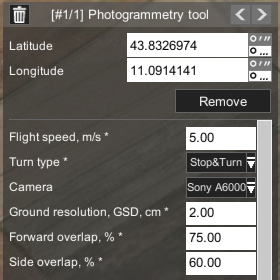
The next step is to set GSD and overlapping for the camera in Photogrammetry tool’s settings window (Figure 2).

Figure 2: Setting camera’s Ground Sampling Distance and overlapping

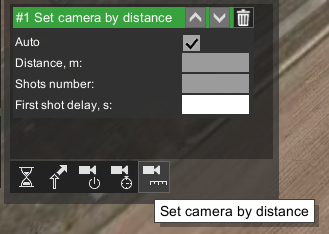
To take photos in Photogrammetry tool’s setting window, define the control action of the camera (Figure 3). Set camera by distance triggering action with default values.

Figure 3: Setting camera’s control action

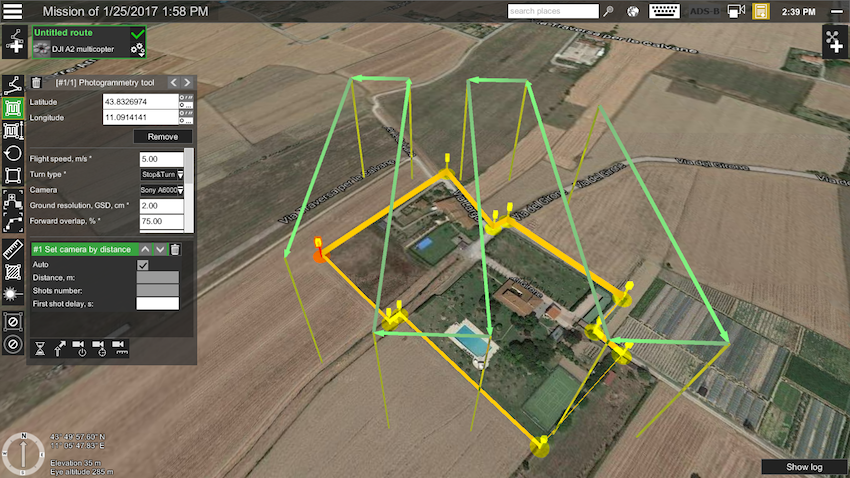
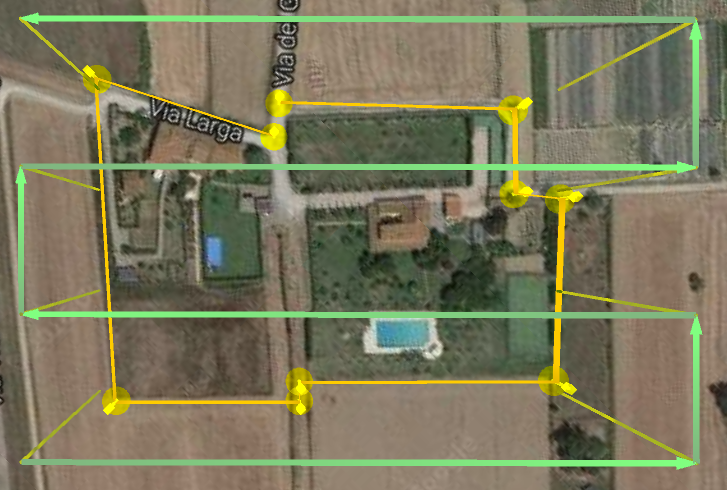
At this point, initial route planning is completed. UgCS will automatically calculate photogrammetry route (see Figure 4).

Figure 4: Calculated photogrammetry survey route before optimisation

-Route optimisation

To optimise the route, it’s calculated parameters should be known: altitude, estimated flight time, number of shots, etc.

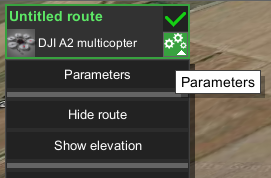
Part of the route’s calculated information can be found in the elevation profile window. To access the elevation profile window (if it is not visible on screen) click the parameters icon on the route card (lower-right corner, see Figure 5), and from the drop-down menu select show elevation:

Figure 5: Accessing elevation window from Route cards Parameters settings

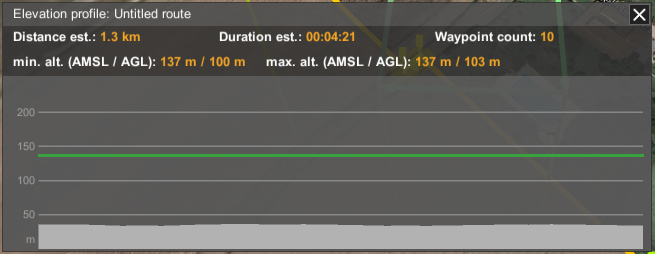
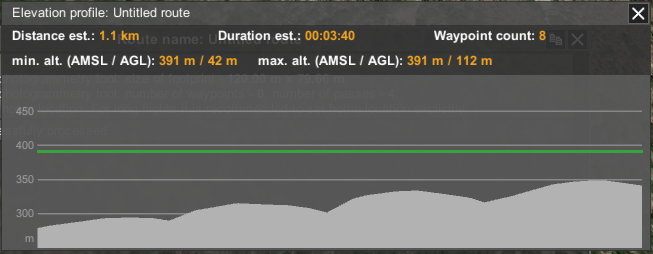
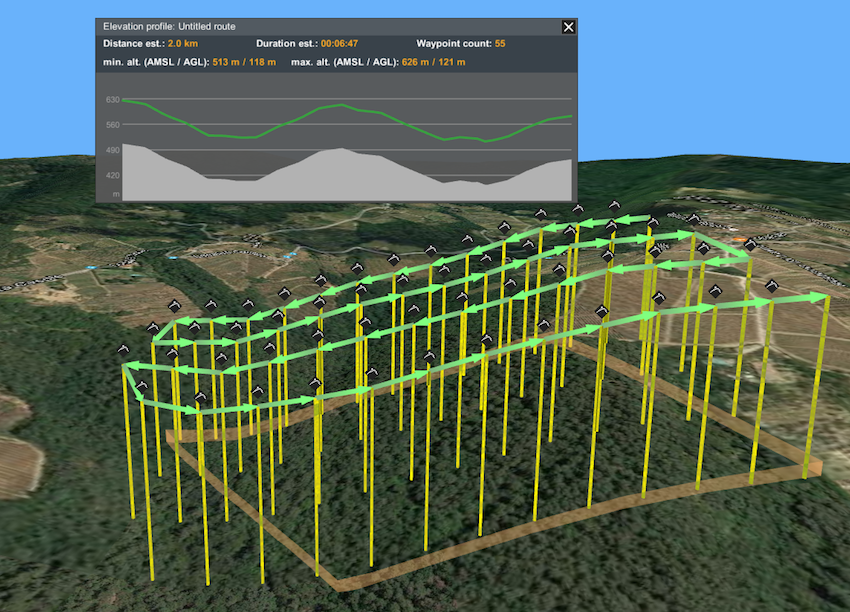
The elevation profile window will present an estimated route length, duration, waypoint count and min/max altitude data:

Figure 6: Route values in elevation profile window

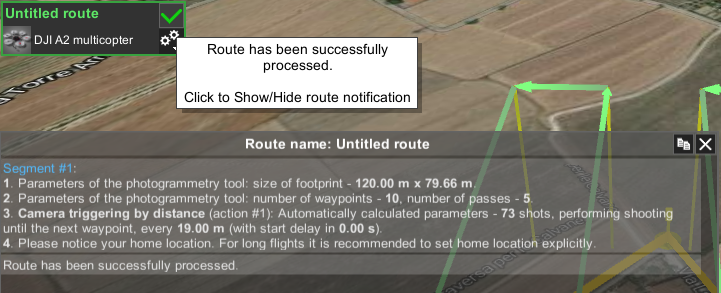
To get other calculated values, open route log by clicking on route status indicator: the green check-mark (upper-right corner, see Figure 7) of the route card:

Figure 7: Route card and status indicator, Route log

Using route parameters, it can be optimised to be more efficient and safe.

-Survey line direction

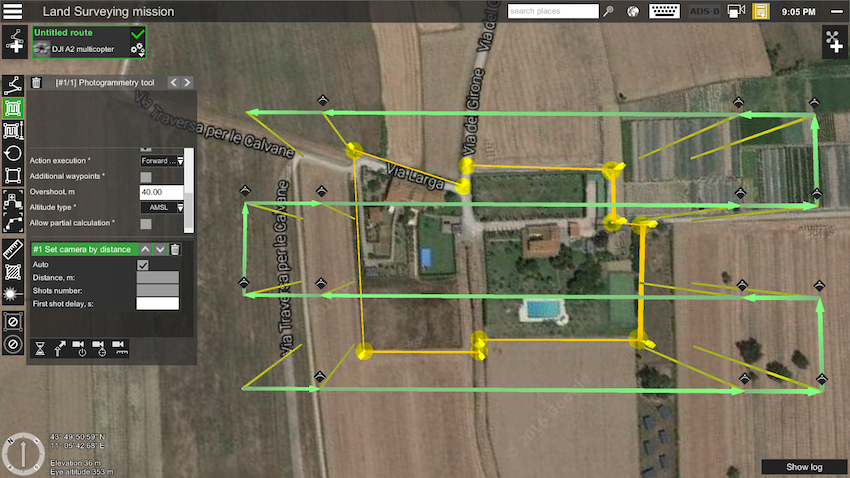
By default, UgCS will trace survey lines from south to north. But, in most cases, it will be more optimal to fly parallel to the longest boundary line of the survey area. To change survey line direction, edit direction angle field in the photogrammetry tool. In the example, by changing angle to 135 degrees, the number of passes is reduced from five (Figure 4) to four (Figure 8) and route length is 1km instead of 1.3km.

Figure 8: Changed survey line angle to be parallel to longest boundary

-Altitude type

UgCS Photogrammetry tool has the option to define how to trace the route according to altitude, with constant altitude above ground (AGL) or above mean sea level (AMSL). Please refer to your data processing software requirements as to which altitude tracking method it recommend.

In the UgCS team’s experience, the choice of altitude type depends on desired result. For orthophotomap (standard aerial land survey output format) it is better to choose AGL to ensure constant GSD for the entire map. If the aim is to produce DEM or 3D reconstruction, use AMSL so the data processing software has more data to correctly determine ground elevation by photos in order to provide more qualitative output.

Figure 9: Elevation profile with constant altitude above mean sea level (AMSL)

In this case, UgCS will calculate flight altitude based on the lowest point of the survey area.

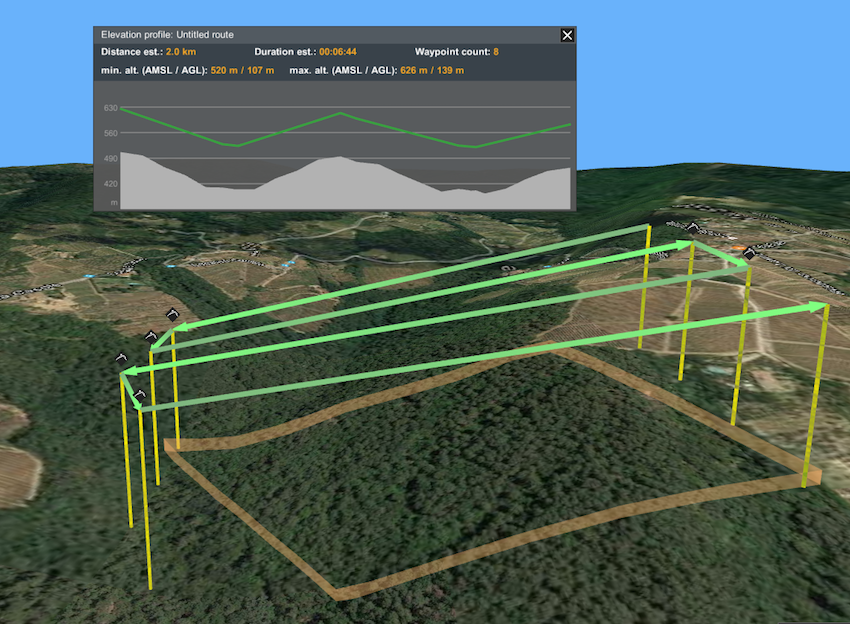
If AGL is selected in photogrammetry tool’s settings, UgCS will calculate the altitude for each waypoint. But in this case, terrain following will be rough if no “additional waypoints” are added (see Figure 10).

Figure 10: Elevation profile with AGL without additional waypoints

Therefore, if AGL is used, add some “additional waypoints” flags and UgCS will calculate a flight plan with elevation profile accordingly (see Figure 11).

Figure 11: Elevation profile with AGL with additional waypoints

-Speed

In general, if flight speed is increased it will minimise flight time. But high speed in combination with large camera exposure can result in blurred images. In most cases 10m/s is the best choice.

-Camera control method

UgCS supports 3 camera control methods (actions):

  1. Make a shot (trigger camera) in waypoint,
  2. Make shot every N seconds,
  3. Make shot every N meters.

Not all autopilots support all 3 camera control options. For example (quite old) DJI A2 does support all three options, but newer (starting from Phantom 3 and up to M600) cameras support only triggering in waypoints and by time. DJI promised to implement triggering by distance, but it’s not available yet.

Here are some benefits and drawbacks for all three methods:

Table 1: Benefits and Drawback for camera triggering methods

In conclusion:

  • Trigger in waypoints should be preferred when possible
  • Trigger by time should be used only if no other method is possible
  • Trigger by distance should be used when triggering in waypoints is not possible to use

To select triggering method in UgCS Photogrammetry tool accordingly, use one of three available icons:

  • Set camera mode
  • Set camera by time
  • Set camera by distance

-Glibal control

Drones, e.g., DJI Phantom 3, Phantom 4, Inspire, M100 or M600 with integrated gimbal, have the option to control camera position as part of an automatic route plan.

It is advisable to set camera to nadir position in the first waypoint, and in horizontal position before landing to prevent lenses from potential damage.

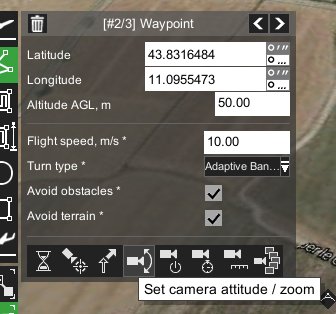
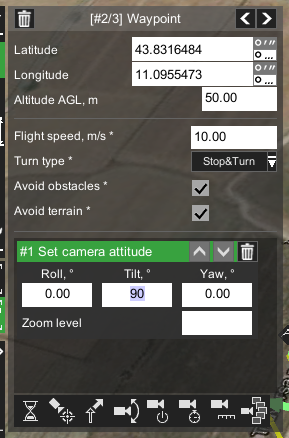
To set camera position, select the waypoint preceding the photogrammetry area and click set camera attitude/zoom (Figure 12) and enter “90” in the “Tilt” field (Figure 13).

Figure 12: Setting camera attitude

Figure 13: Setting camera position

As described previously, this waypoint should be a Stop&Turn type, otherwise the drone could skip this action.

To set camera to horizontal position, select last waypoint of survey route and click set camera attitude/zoom and enter “0” in the “Tilt” field.

-Turn types

Most autopilots or multirotor drones support different turn types in waypoints. Most popular DJI drones have three turn-types:

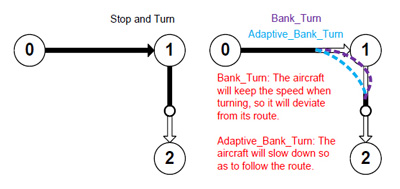
  • Stop and Turn: drone flies to the fixed point accurately, stays at that fixed point and then flies to next fixed point.
  • Bank Turn: the drone would fly with constant speed from one point to another without stopping.
  • Adaptive Bank Turn: It is almost the same performance like Bank Turn mode (Figure 13), but the real flight routine will be more accurately than Bank Turn.

It is advisable not to use Bank Turn for photogrammetry missions. Drone interprets Bank Turns as “recommendation destination waypoint”. The drone will fly towards this direction but will almost never pass through the waypoint. Because drone will not pass the waypoint, no action will be executed, meaning the camera will not be triggered, etc.

Adaptive Bank Turn should be used with caution because a drone can miss waypoints and, again, no camera triggering will be initiated.

Figure 14: Illustration of typical DJI drone trajectories for Bank Turn and Adaptive Bank Turn types

Sometimes, adaptive bank turn type has to be used in order to have shorter flight time compared to stop and turn. When using adaptive bank turns, it is recommended to use overshot (see below) for the photogrammetry area.

-Overshot

Initially overshot was implemented for fixed wing (airplane) drones in order to have enough space for manoeuvring a U-turn.

Overshot can be set in photogrammetry tool to add an extra segment to both ends of each survey line.

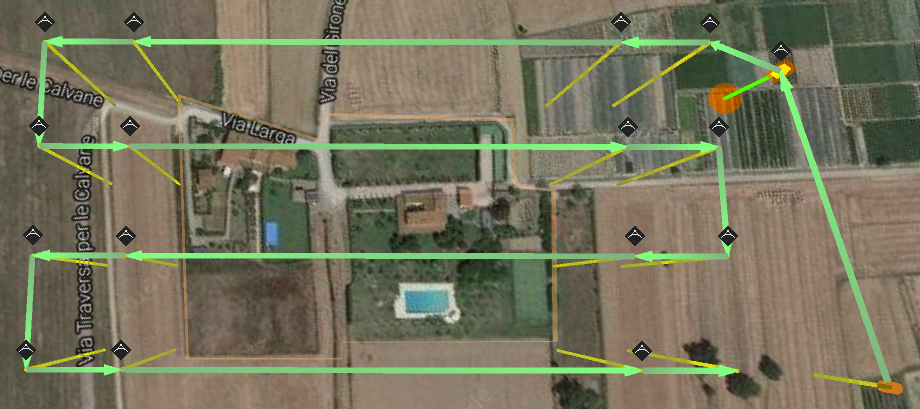
Figure 15: Adding 40m overshot to both ends of each survey line

In the example (Figure 15) can be seen that UgCS added 40m additional segments to both ends of each survey line (comparing to Figure 8).

Adding overshot is useful for copter-UAVs in two situations:

  1. When Adaptive Bank Turns are used (or similar method for non-DJI drones), adding overshot will increase the chance that drone will precisely enter survey line and camera control action will be triggered. UgCS Team recommends to specify overshot that is approximately equal to distance between the parallel survey lines.
  2. When Stop and Turn type is in use in combination with action to trigger camera in waypoints, there is a possibility that before making the shot, drone will start rotation to next waypoint – it can result in having photos with wrong orientation or blurred. To avoid that, shorter overshot has to be set, for example 5m. Don’t specify too short value (< 3m) because some drones could ignore waypoints, that are too close.

Figure 16: Example of blurred image taken by drone in rotation to next waypoint

-Takeoff point

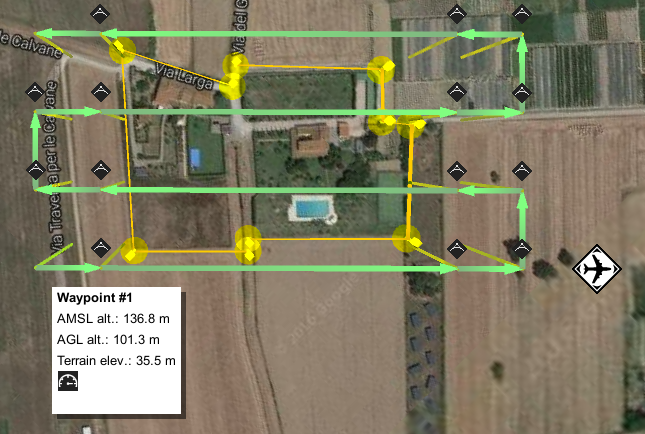
It is important to check the takeoff area at site before flying any mission! To better explain best practice on how to set takeoff point, first discuss an example of how it should not be done. Supposing that the takeoff point in our example mission (Figure 17) would be from the point marked with the airplane-icon, and drone pilot would upload the route on the ground with set automatic mission for automatic take-off.

Figure 17: Take-off point example

Most drones in automatic takeoff mode would climb to low altitude about 3-10meters and then fly straight towards the first waypoint. Other drones would fly towards first waypoint straight from ground. Looking closely at the example map (Figure 17), some trees between the takeoff point and the first waypoint can be noticed. In this example, the drone more likely will not reach a safe altitude and will hit the trees.

Not only the surroundings can affect takeoff planning. Drone manufacturers can change drones elevation behavior in drone firmware, therefore after firmware updates it is recommended that you check drones automatic takeoff mode.

Also, a very important consideration is that most small UAVs use relative altitude for mission planing. Altitude counted relatively according to first waypoint is a second reason why an actual takeoff point should be near the first waypoint, and on the same terrain level.

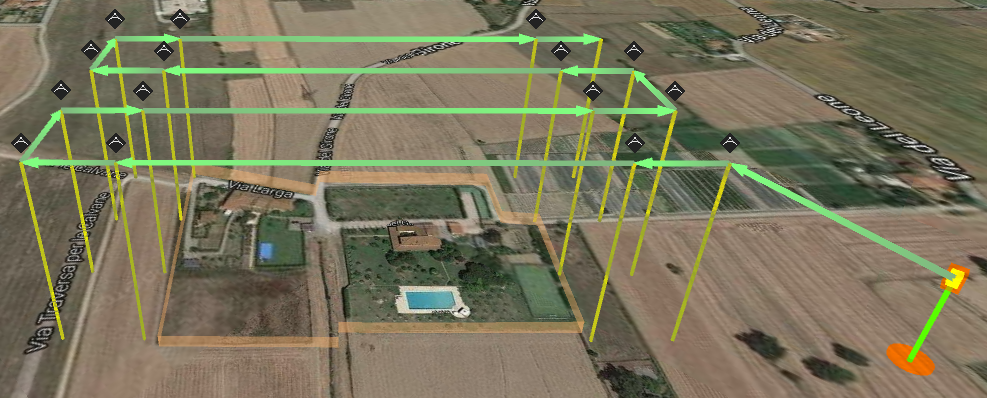
UgCS Team recommends placing the first waypoint as close as possible to actual takeoff point and specifying a safe takeoff altitude (≈30m in most situations will be above any trees, see Figure 18). This is the only method that warrants safe takeoff for any mission. It also protects from any weird drone behaviour and unpredictable firmware updates, etc.

Figure 18: Route with safe take-off

-Entry point to the survey grid

In the previous example, (see Figure 18), it can be noticed, that after adding the takeoff point, the route’s survey grid entry point was changed. This is because if additional waypoint is added subsequently to the photogrammetry area, UgCS will plan to fly the survey grid starting from nearest corner to the previous waypoint.

To change the entry point to survey grid, set additional waypoint close to the desired starting corner (see Figure 19).

Figure 19: Changing survey grid entry point by adding additional waypoint

-Landing point

If no landing point will be added outside the photogrammetry area after the survey mission, the drone will fly and hover in the last waypoint. There are two options for landing:

  1. Take manual control over the drone and fly to landing point manually,
  2. Activate the Return Home command in UgCS or from Remote Controller (RC).

In situations when the radio link with the drone is lost, for example if the survey area is large or there are problems with the remote controller, depending on the drone and it’s settings, one of these actions can occur:

  • Drone will return to home location automatically if lost radio link with ground station,
  • Drone will fly to last waypoint of survey area and hover as long as battery capacity will enable that, then: drone will perform emergency landing, or it will try to fly to home location.

The recommendation is to add an explicit landing points to the route in order to avoid relying on unpredictable drone behavior or settings.

If the drone doesn’t support automatic landing, or the pilot prefers to land manually, place the route’s last waypoint over the planned landing point with an altitude for comfortable manual drone descending and landing above any obstacles in the surrounding area. In general 30m is best choice.

-Action execution

Photogrammetry tool has a magic parameter “Action Execution” with three possible values:

  • Every point
  • At start
  • Forward passes

This parameter defines how and where camera actions specified for photogrammetry tool will be executed.

The most useful option for photogrammetry/survey missions is to set forward passes, the drone will make photos only on survey lines, but will not make excess photos on perpendicular lines.

-Complex survey areas

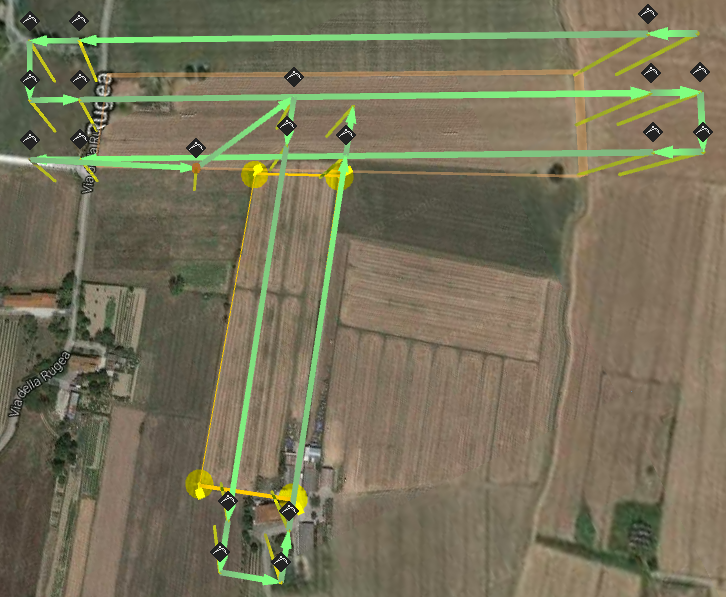
UgCS enables photogrammetry/survey mission planning for irregular areas, having functionality to combine any number of photogrammetry areas in one route, avoiding splitting the area in separate routes.

For example, if a mission has to be planned for two fields connected in a T-shape, and if these two fields are marked as one photogrammetry area, the whole route will not be optimal, regardless any direction of survey lines.

Figure 20: Complex survey area before optimisation

If the survey area is marked as two photogrammetry areas within one route, survey lines for each area can be optimised individually (see Figure 21).

Figure 21: Optimised survey flight passes for each part of a complex photogrammetry area


Step three: deploy ground control points

Ground control points are mandatory if the survey output map has to be precisely aligned to coordinates on Earth.

There are lots of discussions about the necessity of ground control points in cases when a drone is equipped with Real Time Kinematics (RTK) GPS receivers with centimeter-level accuracy. This is useful, but the drone coordinates are not in themselves sufficient because, for precise map aligning, image center coordinates are necessary.

Data processing softwares like Agisoft Photoscan, Dronedeplay, Pix4d, Icarus OneButton and others will produce very accurate maps using geotagged images, but the real precision of the map will not be known without ground control points.

Conclusion: ground control points have to be used to create survey-grade result. For a map with approximate precision, it is sufficient to rely just on RTK GPS and the capabilities of data processing software.


Step four: fly your mission

For carefully planned missions, flying it is the most straightforward step. Mission execution differs according to the type of UAV and equipment used, therefore it will not be described in detail in this article (please refer to equipment’s and UgCS documentation).

Important issues before flying:

  • In most countries there are strict regulations for UAV usage. Always comply with the regulations! Usually these rules can be found on web-site of local aviation authority.
  • In some countries special permission for any kind of aerial photo/video shooting is needed. Please check local regulations.
  • In most cases missions are planned before arriving to flying location (e.g., in office, at home) using satellite imaginary from Google maps, Bing, etc. Before flying always check actual circumstances at the location. There could be a need to adjust take-off/landing points, for example, to avoid tall obstacles (e.g., trees, masts, power lines) in your survey area.

Step five: image geotagging

Image geotagging is optional if ground control points were used, but almost any data processing software will require less time to process geotagged images.

Some of the latest and professional drones with integrated cameras can geotag images automatically during flight. In other cases images can be geotagged in UgCS after flight.

Very important: UgCS uses the telemetry log from drone, that is received via radio channel, to extract the drone’s altitude for any given moment (when pictures were taken). To geotag pictures using UgCS, assure robust telemetry reception during flight.

For detailed information how to geotag images using UgCS refer to UgCS User Manual.


Step six: data processing

For data processing, use third party software or services available on the market.

From UgCS Team experience, the most powerful and flexible software is Agisoft Photoscan (http://www.agisoft.com/), but sometimes too much user input is required to get necessary results. The most uncomplicated solution for users is online service Dronedeploy (https://www.dronedeploy.com/). All other software packages and services will fit somewhere between these two in terms of complexity and power.


Step seven (optional): import created map to UgCS

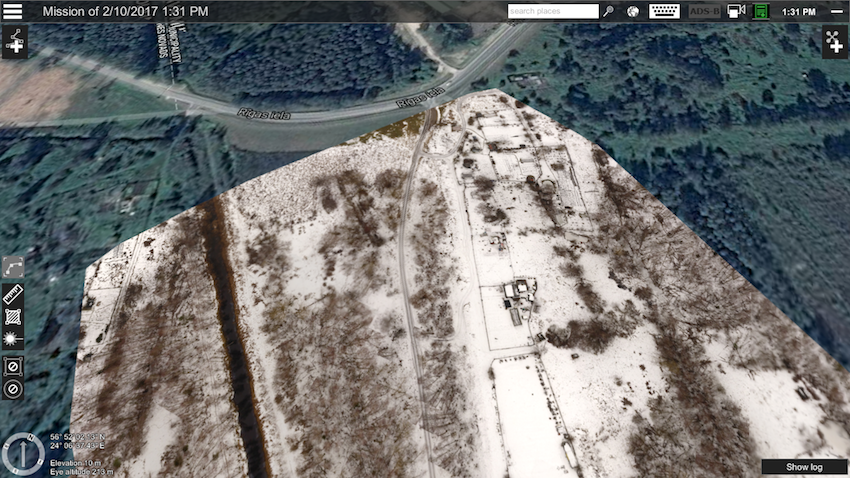
Should the need arise for the mission to be repeated in the future, UgCS enables importing the GeoTiff file as a map layer and using it for mission planning. More detailed instructions can be found in UgCS User Manual. See the result of an imported map created using UgCS photogrammetry tool imported as GeoTiff file in Figure 22.

Figure 22: Imported GeoTiff map as layer. The map is output of a Photogrammetry survey mission panned with UgCS

Visit the UgCS homepage

Download this tutorial as a PDF


If you liked this tutorial, you may also enjoy these:

See all the latest robotics news on Robohub, or sign up for our weekly newsletter.

TrotBot take two: Galloping like a horse

$
0
0

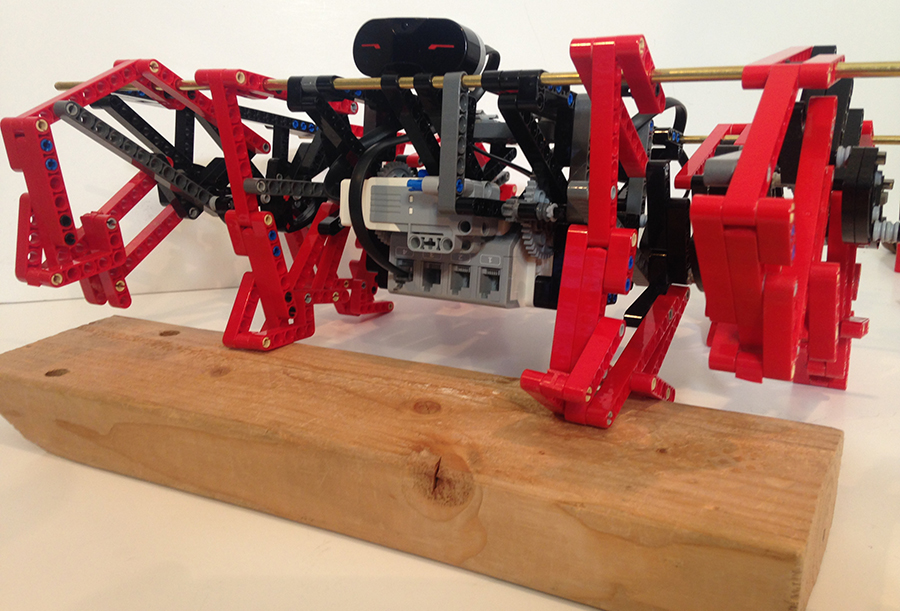
Hi, I’m Ben. I was a member of the team that developed a new walking mechanism, TrotBot, that we eventually scaled up to the size of a mini-van (you can read my original post here). Now, at DIYwalkers, I’ve posted plans for TrotBot Ver. 2, designed to handle the weight of the EV3 brick. As you can see in the following videos, we were able to improve TrotBot by borrowing some ideas from a galloping horse.

Just like lunges are more tiring by simply walking, robots with bumpy gaits require more power to walk. This may not be a problem at small scales, but as a robot’s weight increases, smoother gaits are required.  TrotBot Ver. 1 has somewhat of a bumpy gait, but as you can see in my video below, TrotBot’s weight at LEGO-scale is low enough that it walks well:

However, when I added LEGO’s relatively heavy EV3 brick to TrotBot it didn’t perform so well.  To reduce its power requirements, I needed to smooth TrotBot’s gait, which I did by adding active feet that mimic the leg action of a galloping horse.


Background on TrotBot and its Feet

Our goal for TrotBot was to create a walking mechanism capable of walking on rough terrain and areas generally inaccessible to wheeled vehicles, so we designed its linkage to step high. We initially prototyped TrotBot in LEGO with 8 legs.  It walked well enough that we—somewhat naively—thought we could scale it up to mini-van size with only 8 legs.  A team of us spent most of that summer’s boiling hot weekends building our large TrotBot in my garage, only to find, during our first walking test, that too much torque was required to drive the robot up from the gait’s low point.  As we discovered, large walkers should always have at least one foot in contact with the ground at each corner, like how a car’s four wheels are always in contact with the ground. Below, I simulated one corner of a 12 leg version of TrotBot, and as you can see we should have scaled up TrotBot with 12 legs like Theo Jansen’s famous Strandbeest has:

It would have required too many new parts to switch to a 12 leg version of TrotBot, and we didn’t want to start over from scratch, so instead we explored ideas for active feet that could smooth TrotBot’s 8 legged gait.

Using a galloping horse’s gait as inspiration we sought to add some sort of second foot to each leg that would mimic how a horse’s rear then front legs land in pairs. This resulted in the additional linkage that we call TrotBot’s “heel” which increased TrotBot’s foot-contact with the ground by about 10%, reduced how much the feet skidded, and increased the step-height of TrotBot’s rear legs. Shown below is a video comparing TrotBot with these “heels” to a galloping horse:

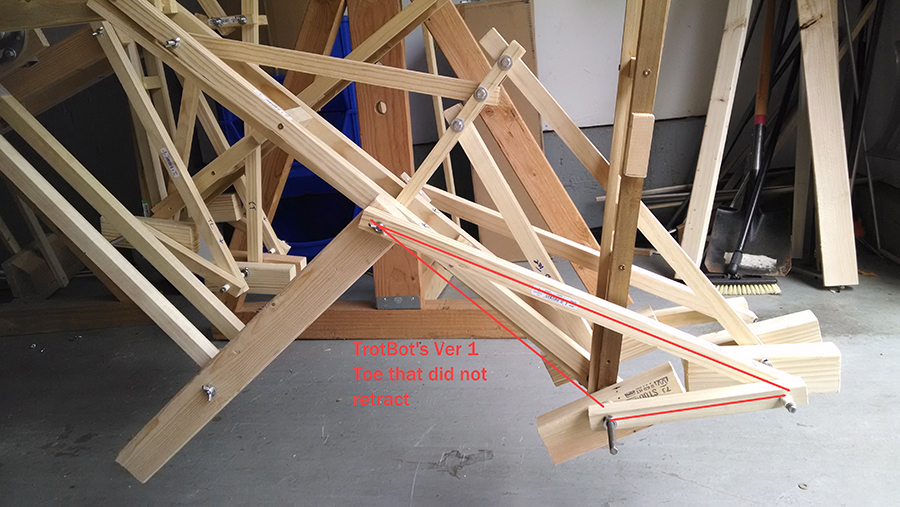
Next, we explored adding some sort of toe that would push down on the ground as the foot begins to lift, just like how humans use their toes to walk. We installed one of these toe ideas on our large TrotBot but they didn’t smooth the gait enough, and since they were attached to the legs at a fixed angle they tended to catch on obstacles. Catching on obstacles occasionally caused the linkage to lock and gears to grind. In other words, this toe compromised our main goal of creating a mechanism that could walk on rough terrain! Here’s a photo of that toe:

TrotBot’s fixed angle toe

Looking again to a galloping horse for inspiration we started to experiment with linkages that mimicked how horses paw their hooves backward and then keep them folded back as they lift their legs to strike the ground again. We discovered a few options that mimicked this action, and they smoothed the gait by increasing TrotBot’s foot-contact by another 10% while maintaining its high foot-path. I added one of these toe options to TrotBot Ver. 2, and while I couldn’t make a toe with accurate dimensions using LEGO’s integer-based beams, it still smoothes TrotBot’s gait significantly:

Click here for instructions on how to build your own TrotBot Ver. 2!

Programming your NAO robot for human interaction

$
0
0

Today we are looking at how to program your NAO Robot for Human Interaction. Watch the video and follow the steps below to get interactive with your robot pal!

  1.  Create an animation of movements
    • Right click, select “Create a new box”
    • Select “Timeline”

We want the robot to do 3 things, a five high, a hello, and a goodbye move:

  • On the Timeline Edit Box
    • Name: High Five
    • Image: Click “Edit”
      • On the Edit box image
      • Click “Browse” and select a file
    • Click “OK”

Now, as you can remember, if we take it to the box, we can get access to the NAO’s Timeline. Mine now is connected to the PC. So what I’m going to do is I’m going to set some points of the NAO to do some movements. As I have said before on one of my tutorial I’m going to make it set all the joints to the whole body.

We want to make him look like he is doing a high five:

  • Right click the arm
    • Click “Stiffen chain on/off”
    • Raise his arm up
  • Set joints and keyframe
    • Select “Arms”
  • Click “Play” on the Motion Controller

That’s a quite quick high five actually. What we want to do is to actually give him a pause when he got his arm in the air. So, the way we do that is to copy and paste the keyframe.

Grab a few already built in animation, just to show you how much it works:

  • Go to Motions>Animations
    • Drag a “Hello” box to the workspace
    • Drag a “Wipe Forehead” box for a goodbye move to the workspace

We want to hear him speak, so:

  • Go to Voice
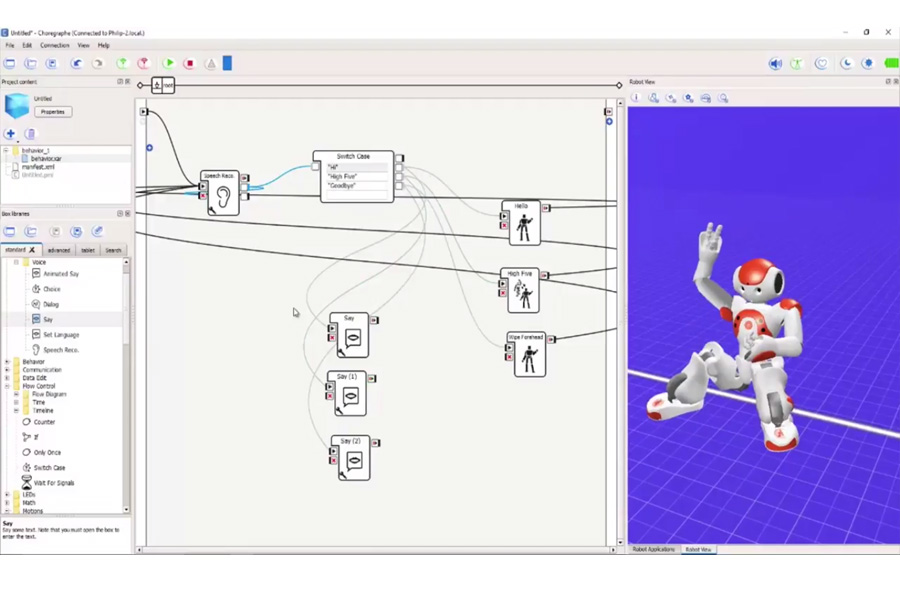
    • Drag a “Speech Recognition” box to the workspace
  • Drag a “Switch Case”
    • Connect the “Speech Recognition” box to the “Switch Case” box
    • On the first case, write “Hello” and connect to the “Hello” box
    • On the second case, write “High Five” and connect it to the “High Five” box
    • On the third case, write “Goodbye” and connect it to the “Wipe Forehand” box
  • Set parameters of Speech Recognition
    • Word list: Hi; High Five; Goodbye;
    • Play with the threshold to see what works better
    • Click “OK”

So there we have a speech recognition, he will listen to what I am saying and then we will act a motion. Now, what we need to do is to make sure that the robot doesn’t repeat it, so you know, it doesn’t loop back. Before we do that, we are going to:

  • Drag 3 “Say” box to the workspace so he can  speak back to us
    • On the “Switch case”, connect the “Hello” case on the “Say” box
      • Localized Text
        • Change the language to English(United States)
        • Write “Hi” on the textbox
    • Connect the “High Five” case on the “Say (1)” box
      • Localized Text
        • Change the language to English(United States)
        • Write “High Five” on the textbox
    • Connect the “Goodbye” case on the “Say(2)” box
      • Localized Text
        • Change the language to English(United States)
        • Write “Goodbye” on the textbox

So, here’s what we are saying, he recognizes it, says a word and does an animation, now what we want to do is we don’t want him to loop, as in he keeps hearing the same sound and maybe he starts to hear himself and repeat himself, so to stop that we need to connect the end of the motion boxes back to the “Speech Recognition” box. A simple output to the input speech.

I am going to make a little change actually, instead of “Hello”, we should put “Hi” here and I’m going to put “Hi” in there which is already done because they have to match otherwise if it doesn’t match he won’t recognize it. So if he hit “Load”

Philip: High Five!

Nao: High Five!

Philip: Goodbye!

Nao: Goodbye!

Philip: Hi!

Nao: Hello!

Brilliant! So that looks likes he’s working very well, so again if we says “Hi”, “High Five” or “Good bye” then he will greet you. If you walk in to room and you say “Hi” to a robot, obviously, he will do his animation and say a speech. Here you can use your imagination and try different things, different animations.


If you liked this article, you may also enjoy these from Robo-Phil:

See all the latest robotics news on Robohub, or sign up for our weekly newsletter.

The Robot Academy: An open online robotics education resource

$
0
0

The Robot Academy is a new learning resource from Professor Peter Corke and the Queensland University of Technology (QUT), the team behind the award-winning Introduction to Robotics and Robotic Vision courses. There are over 200 lessons available, all for free.

Educators are encouraged to use the Academy content to support teaching and learning in class or set them as flipped learning tasks. You can easily create viewing lists with links to lessons or masterclasses. Under Resources, you can download a Robotics Toolbox and Machine Vision Toolbox, which are useful for simulating classical arm-type robotics, such as kinematics, dynamics, and trajectory generation.

The lessons were created in 2015 for the Introduction to Robotics and Robotic Vision courses. We describe our approach to creating the original courses in the article, An Innovative Educational Change: Massive Open Online Courses in Robotics and Robotic Vision. The courses were designed for university undergraduate students but many lessons are suitable for anybody, see the difficulty rating on each lesson.

Under Masterclasses, students can choose a subject and watch a set of videos related to that particular topic. Single lessons can offer a short training segment or a refresher. Three online courses, Introducing Robotics, are also offered.

Below are two examples of a lesson and masterclass. We encourage everyone to take a look at the QUT Robot Academy by visiting our website.


Single Lesson

Out and about with robots

In this video, we look at a diverse range of real-world robots and discuss what they do and how they do it.


Masterclass

Robot joint control: Introduction (Video 1 of 12)

In this video, students learn how we make robot joints move to the angles or positions that are required to achieve the desired end-effector motion. This is the job of the robot’s joint controller. In the lecture, we will take discuss the realms of control theory.


Robot joint control: Architecture (video 2 of 12)

In this lecture, we discuss a robot joint is a mechatronic system comprising motors, sensors, electronics and embedded computing that implements a feedback control system.


Robot joint control: Actuators (video 3 of 12)

Actuators are the components that actually move the robot’s joint. So, let’s look at a few different actuation technologies that are used in robots.

To watch the rest of the video series, visit their website.


If you enjoyed this article, you may also want to read:

See all the latest robotics news on Robohub, or sign up for our weekly newsletter.

The Robot Academy: Lessons in image formation and 3D vision

$
0
0

A 3D model of organic molecules created using Rhinoceros 3D and rendered with Vray. Source: Wikipedia Commons

The Robot Academy is a new learning resource from Professor Peter Corke and the Queensland University of Technology (QUT), the team behind the award-winning Introduction to Robotics and Robotic Vision courses. There are over 200 lessons available, all for free.

The lessons were created in 2015 for the Introduction to Robotics and Robotic Vision courses. We describe our approach to creating the original courses in the article, An Innovative Educational Change: Massive Open Online Courses in Robotics and Robotic Vision. The courses were designed for university undergraduate students but many lessons are suitable for anybody, as you can easily see the difficulty rating for each lesson. Below are several examples of image formation and 3D vision.


The geometry of image formation

The real world has three dimensions but an image has only two. We can use linear algebra and homogeneous coordinates to understand what’s going on. This more general approach allows us to model the positions of pixels in the sensor array and to derive relationships between points on the image and points on an arbitrary plane in the scene.

Watch the rest of the Masterclass here.


How images are formed

How is an image formed? The real world has three dimensions but an image has only two: how does this happen and what are the consequences? We can use simple geometry to understand what’s going on.

Watch the rest of the Masterclass here.


3D vision

An image is a two-dimensional projection of a three-dimensional world. The big problem with this projection is that big distant objects appear the same size as small close objects. For people, and robots, it’s important to distinguish these different situations. Let’s look at how humans and robots can determine the scale of objects and estimate the 3D structure of the world based on 2D images.

Watch the rest of the Masterclass here.


If you liked this article, you may also enjoy:

See all the latest robotics news on Robohub, or sign up for our weekly newsletter.

From drinking straws to robots

$
0
0

Image: Harvard Gazette

By Peter Reuell, Harvard Staff Writer

At the beginning of the decade, George Whitesides helped rewrite the rules of what a machine could be with the development of biologically inspired “soft robots.” Now he’s poised to rewrite them again, with help from some plastic drinking straws.

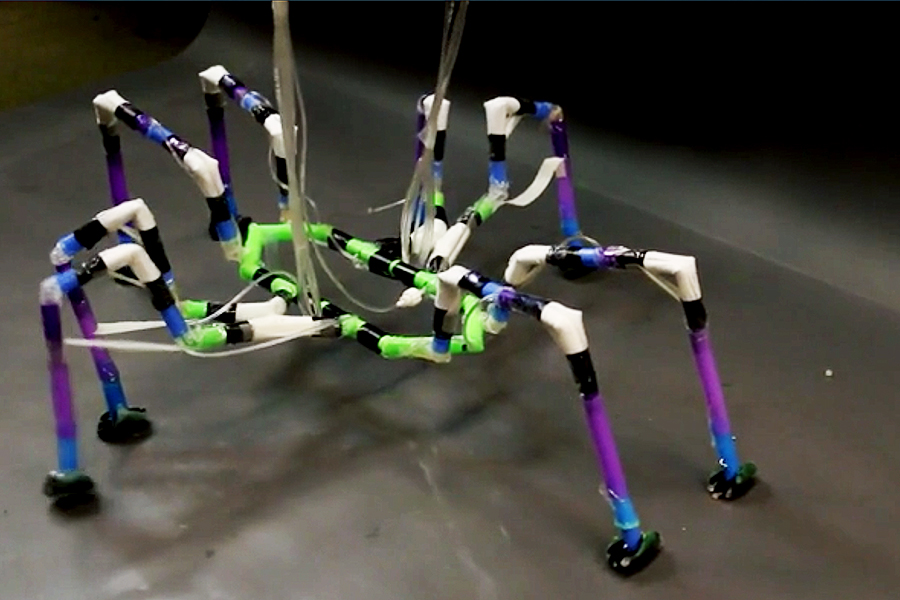
Inspired by arthropod insects and spiders, Whitesides and Alex Nemiroski, a former postdoctoral fellow in Whitesides’ Harvard lab, have created a type of semi-soft robot capable of standing and walking. The team also created a robotic water strider capable of pushing itself along the liquid surface. The robots are described in a recently published paper in the journal Soft Robotics.

Unlike earlier generations of soft robots, which could stand and awkwardly walk by inflating air chambers in their bodies, the new robots are designed to be far nimbler. Though real-world applications are still far off, the researchers hope the robots eventually could be used in search operations following natural disasters or in conflict zones.

“If you look around the world, there are a lot of things, like spiders and insects, that are very agile,” said Whitesides, the Woodford L. and Ann A. Flowers University Professor at Harvard. “They can move rapidly, climb on various items, and are able to do things that large, hard robots can’t do because of their weight and form factor. They are among the most versatile organisms on the planet. The question was, how can we build something like that?”

The answer, Nemiroski said, came in the form of your average drinking straw.

“This all started with an observation that George made, that polypropylene tubes have an excellent strength-to-weight ratio. That opened the door to creating something that has more structural support than purely soft robots have,” he said. “That was the building block, and then we took inspiration from arthropods to figure out how to make a joint and how to use the tubes as an exoskeleton. From there it was a question of how far can your imagination go? Once you have a Lego brick, what kind of castle can you build with it?”

What they built, he said, is a surprisingly simple joint.

Whitesides and Nemiroski began by cutting a notch in the straws, allowing them to bend. The scientists then inserted short lengths of tubing which, when inflated, would force the joints to extend. A rubber tendon attached on either side would then cause the joint to retract when the tubing deflated.

Armed with that simple concept, the team built a one-legged robot capable of crawling, and moved up in complexity as they added a second and then a third leg, allowing the robot to stand on its own.

“With every new level of systems complexity, we would have to go back to the original joint and make modifications to make it capable of exerting more force or to be able to support the weight of larger robots,” Nemiroski said. “Eventually, when we graduated to six- or eight-legged arthrobots, making them walk became a challenge from a programming perspective. For example, we looked at the way ants and spiders sequence the motion of their limbs and then tried to figure out whether aspects of these motions were applicable to what we were doing or whether we’d need to develop our own type of walking tailored to these specific types of joints.”

While Nemiroski and colleagues were able to control simple robots by hand, using syringes, they turned to computers to control the sequencing of their limbs as the designs increased in complexity.

“We put together a microcontroller run by Arduino that uses valves and a central compressor,” he said. “That allowed us the freedom to evolve their gait rapidly.”

Though Nemiroski and colleagues were able to replicate ants’ distinctive “triangle” gait using their six-legged robot, duplicating a spider-like gait proved far trickier.

“A spider has the ability to modulate the speed at which it extends and contracts its joints to carefully time which limbs are moving forward or backward at any moment,” Nemiroski said. “But in our case, the joints’ motion is binary due to the simplicity of our valving system. Either you switch the valve to the pressure source to inflate the balloon in the joint, and thus extend the limb, or you switch the valve to atmosphere to deflate the joint and thus retract the limb. So in the case of the eight-legged robot, we had to develop our own gait compatible with the binary motion of our joints. I’m sure it’s not a brand-new gait, but we could not duplicate precisely how a spider moves for this robot.”

Developing a system that can fine-tune the speed of actuation of the legs, Nemiroski said, would be a useful goal for future research, and would require programmable control over the flow rate supplied to each joint.

“We hit that limitation in the system, which I’m actually pretty proud of, because it means we pushed it to its absolute limit,” he said. “We took the basic concept and asked how far can we go before we would have to make radical alterations to how these limbs work, and we found that limit at the eight-legged robot. We were able to make it walk, but if you wanted to make it walk faster, or to add more limbs — for example, to support a load — you would have to start rethinking the system from the ground up.”

Though it may be years before the robots find their way into real-world applications, Whitesides believes the techniques used in their development — particularly the use of everyday, off-the-shelf materials — can point the way toward future innovations.

“I don’t see any reason to reinvent wheels,” he said. “If you look at drinking straws, they can make them at, effectively, zero cost and with great strength, so why not use them? These are academic prototypes, so they’re very light weight, but it would be fairly easy to imagine building these with a lightweight structural polymer that could hold a substantial weight.”

“What’s really attractive here is the simplicity,” added Nemiroski. “This is something George has been championing for some time, and something I grew to appreciate deeply while I was in his lab. For all the complexity of movement and structural integrity we get out of these robots, they’re remarkably simple in terms of construction and control. Using a single, easy-to-find material and a single concept for an actuator, we could achieve complex, multidimensional motion.”


This post was originally published on The Harvard Gazette. Click here to view the original.

This research was supported with funding from the U.S. Department of Energy, DARPA, the Natural Sciences and Engineering Research Council of Canada, the National Science Foundation, the Swedish Research Council, and the Wyss Institute for Biologically Inspired Engineering at Harvard University.

Viewing all 284 articles
Browse latest View live